

Master AWS Elastic Beanstalk
From Configuration Options to Deployment Method to CI CD with Zero Downtime, etc.


Table of contents
- What is Elastic Beanstalk
- Why Elastic Beanstalk
- Is Configuring Elastic Beanstalk complex?
- Basics OF AWS Elastic Beanstalk
- What can we Customize in AWS Elastic Beanstalk?
- Configuration Options in EB
- Prerequisites for Elastic Beanstalk
- Deploy Node JS in Elastic Beanstalk
- How to Update the Application Code?
- How to update an Application with NPM Dependencies?
- Downtime in Deployment
- Accessing SSL with Custom Domain
- Add Environment Variables in Elastic Beanstalk
- CI CD in ElasticBeanstalk?
- CI CD with zero Downtime
- Perform a blue/green deployment
- Clone the ENVIRONMENT
- How to Save Configuration?
- How to Terminate , Restore?
- Configuration options
What is Elastic Beanstalk
AWS Elastic Beanstalk is an orchestration service offered by Amazon Web Services for deploying applications which orchestrates various AWS services, including EC2, S3, Simple Notification Service, CloudWatch, autoscaling, and Elastic Load Balancers.
Why Elastic Beanstalk
Elastic Beanstalk reduces management complexity without restricting choice or control. You simply upload your application, and Elastic Beanstalk automatically handles the details of capacity provisioning, load balancing, scaling, and application health monitoring
Is Configuring Elastic Beanstalk complex?
If you are choosing Elastic Beanstalk for deploying your Workloads for the first time the Configuration Options it provides are confusing for beginners.
Elastic Beanstalk is Amazing if configured correctly, and there is not a single correct way to configure it as it all depends upon the need of your business requirements It gives the advantage of scaling, Load Balancing, Blue-green Deployment, swapping Environment Zero Downtime Deployment, and so much,
Basics OF AWS Elastic Beanstalk
Supported Platform

what is the Application and Environment in Elastic Beanstalk
Application
An Elastic Beanstalk application is a logical grouping of components, including environments, versions, and configurations, conceptually similar to a folder.
Environment
An Elastic Beanstalk environment is a collection of AWS resources running a designated application version, provisioned by Elastic Beanstalk when created.
Environment tier
Amazon Elastic Beanstalk has two types of environment tiers to support different types of web applications.
Web server environment: Run a website, web application, or web API that serves HTTP requests.
Worker environment: Run a worker application that processes long-running workloads on demand or performs tasks on a schedule.
What can we Customize in AWS Elastic Beanstalk?
We can customize almost all resources AWS configured for us , These are the some of category options in EB
Configure Environment
Configure Service Access
Networking, Database, and Tags
Configure Instance Traffic and Scaling
Updates Strategy, Monitoring, and Logging.
Configuration Options in EB
Configure Environment
Specify the environment name (e.g., dev, prod).
Define the domain name for your application.
Choose the platform and its version (e.g., Node.js, .NET, Docker, Python, etc.).
your application code or Sample.
Select presets for the environment setup (e.g., single instance, high availability, custom configuration).
Consider utilizing spot instances for cost optimization.
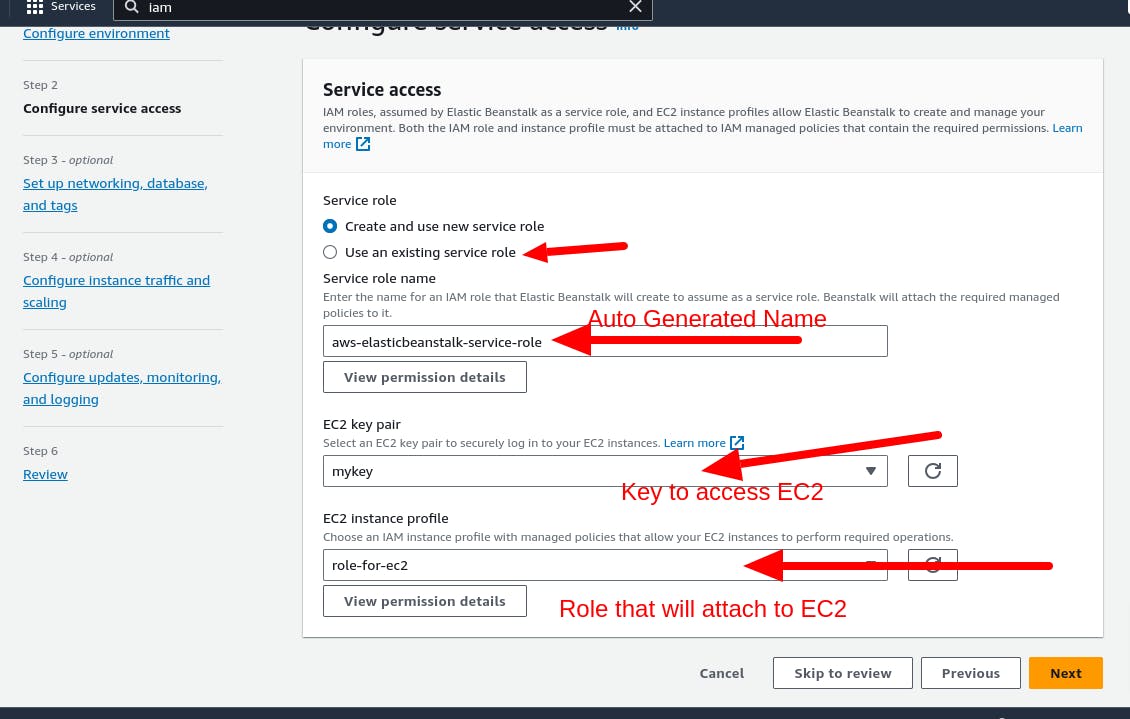
Configure Service Access
Provide an IAM role for Elastic Beanstalk to assume as a service role.
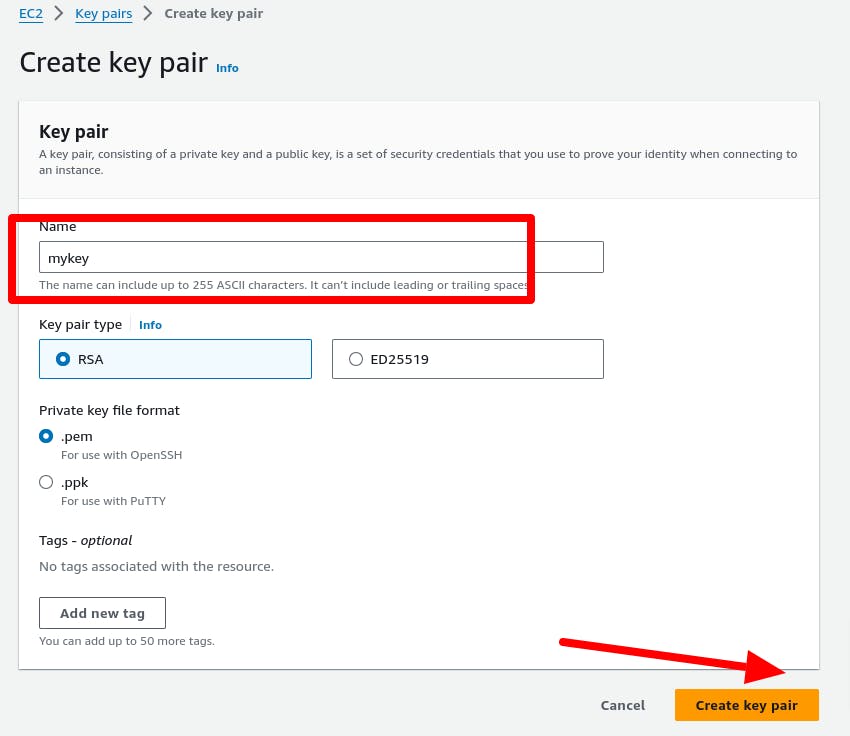
Generate a key pair for secure SSH access to EC2 instances.
IAM instance profile with managed policies allowing necessary operations for EC2 instances.
Set up Networking, Database, and Tags
Optionally launch the environment in a custom VPC.
Define subnets and whether to use public IPv4 addresses.
Integrate an RDS SQL database with the environment.
Configure snapshot and database deletion policies.
Configure Instance Traffic and Scaling
Customize the root volume type and size.
Set the Amazon CloudWatch monitoring interval.
Define security groups of EC2.
Choose the environment type (single instance or load-balanced).
Specify the minimum and maximum instances for load balancing.
Configure fleet composition and instance types.
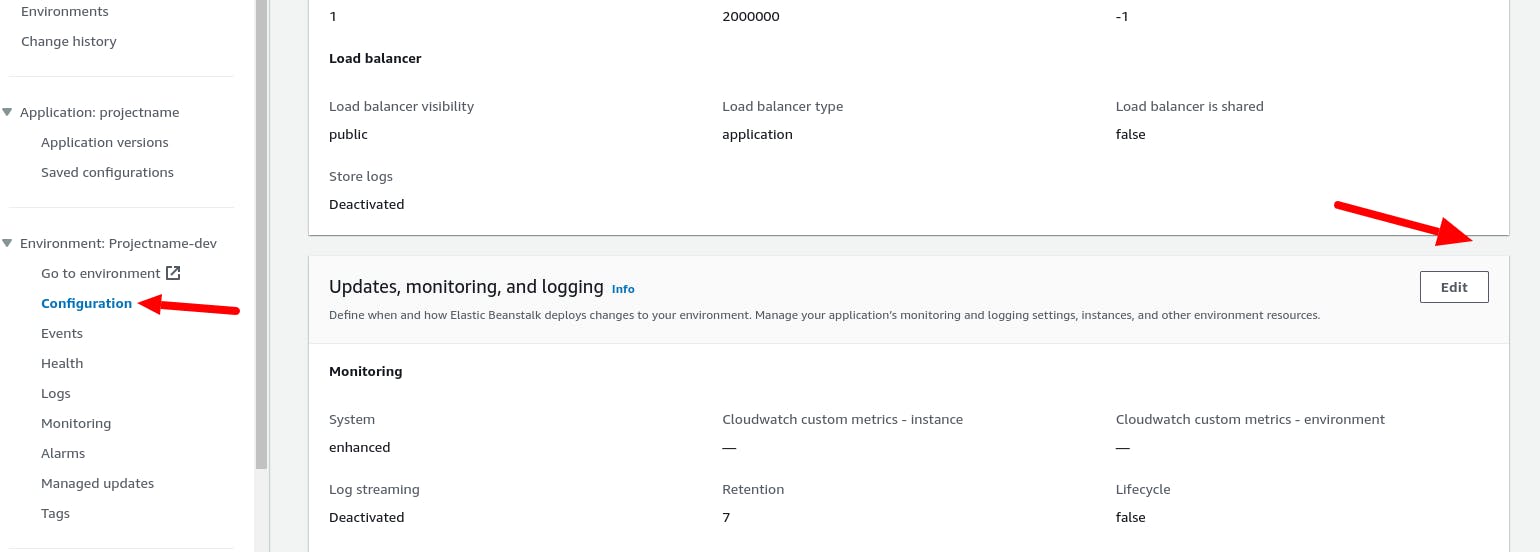
Configure Updates, Monitoring, and Logging
Choose health reporting metrics.
Specify platform update windows.
Set up rolling updates and deployment policies (e.g., all at once, immutable).
Configure a proxy server (e.g., Nginx, Apache).
Please keep in mind these are not the only options we can customize but most of the other options which are not highlighted here are only available when choosing Make sure to follow AWS documentation and best practices for each service to ensure a secure and optimized environment setup.
Deployment Methods in AWS Elastic Beanstalk
AWS Elastic Beanstalk simplifies the deployment of applications by offering a range of deployment strategies tailored to diverse scenarios. These methods ensure smooth application updates while minimizing downtime. Let's explore some key deployment strategies.

† Varies depending on batch size.
†† Varies depending on the evaluation time option setting.
Read More at AWS: https://docs.aws.amazon.com/elasticbeanstalk/latest/dg/using-features.deploy-existing-version.html
Pros and Cons of Deployment Time
When deploying applications in AWS Elastic Beanstalk, the timing of deployments can significantly impact your project's success. Let's examine the pros and cons of different deployment time strategies
| Deployment Method | Description | Pros | Cons |
| All At Once | Simultaneous deployment to all instances | Fast, simple | Risk of downtime if the deployment fails |
| Rolling | Sequential deployment in batches | Reduced downtime, easy rollback | Instances may be running different versions temporarily |
| Rolling with Additional Batch | Like rolling, but with extra instances | No fleet size reduction during deployment | Instances from failed batches may still run the old version |
| Immutable | Duplicate instances, and replace old ones | No downtime on deployment failure | Subject to AWS account limits, potential deployment failure on large fleets |
| Blue/Green | Duplicate the entire environment, swap traffic | Zero downtime, easy rollback | Requires cloning environment, no RDS instances support, potential AWS account limit issues |
Prerequisites for Elastic Beanstalk
In this Prerequisite section, we will create an EC2 Key Pair , and IAM role for Instances
Create a key pair (Optional)
By creating Key Pair we can SSH to the EC2 instances,

Create an IAM role
IAM Role is required by EB to Launched and Modify AWS Resources

Select EC2 as the usecase

Attach these three policies
AWSElasticBeanstalkWebTier ,AWSElasticBeanstalkWorkerTier ,AWSElasticBeanstalkMulticontainerDocker

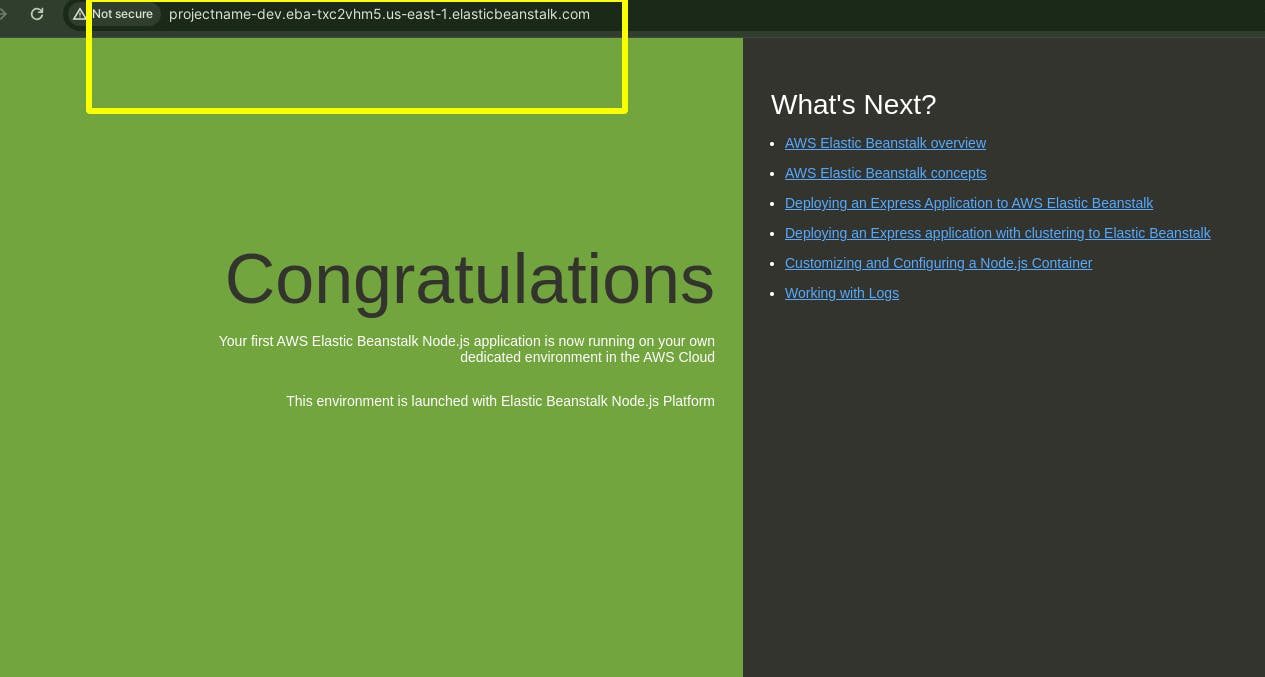
Deploy Node JS in Elastic Beanstalk
Setting Up a Sample Node.js Application in AWS Elastic Beanstalk
Deploying a Node.js application in AWS Elastic Beanstalk is a straightforward process that allows you to leverage the scalability and reliability of AWS infrastructure. Here's how to get started,
Open console.aws.amazon.com/elasticbeanstalk and Click on Create Application
Create an Application

Set up networking, database, and tags

Configure instance traffic and scaling
Here we are choosing capacity as load balancing, Instance type, scaling policy etc

Configure updates, monitoring, and logging
Change Monitoring to Enhanced, and Keep everything default

Review

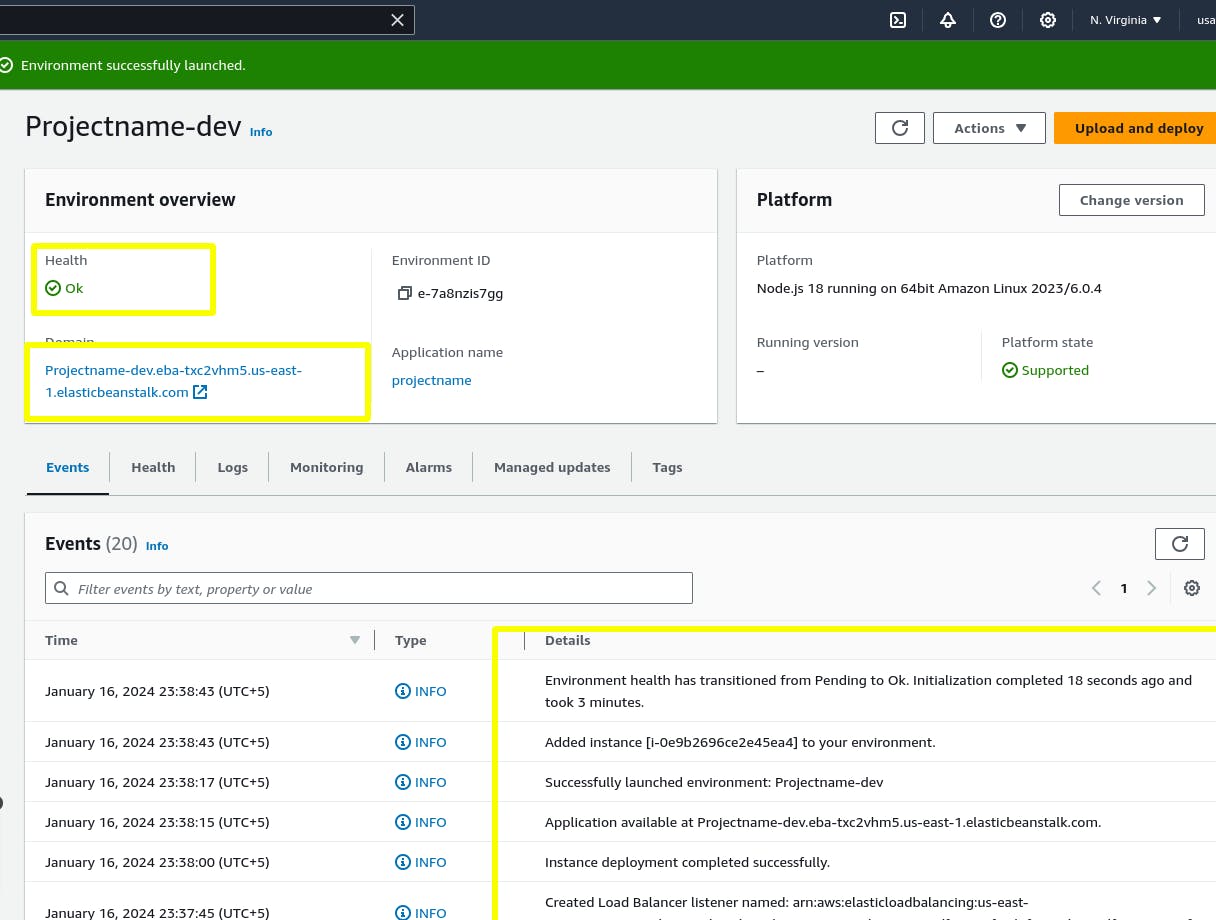
After 5 to 8 minutes
When you create the application in Elastic Beanstalk it creates the following AWS resources
EC2 instance.
Instance security group
Amazon S3 bucket
Amazon CloudWatch alarms
AWS CloudFormation stack
Domain name
Load balancer (Depends Upon your configuration )
we can navigate to the EC2 Dashboard and see the new ALB, with Listers, Target groups, etc

EC2 instance is launched with the IAM Role we choose, SG is created by EB.

Open the Application with the Domain URL from the Elastic Beanstalk Dashboard
How to Update the Application Code?
I have downloaded a Nodejs sample from AWS, and also modified the same code
you can download the default configuration code https://docs.aws.amazon.com/elasticbeanstalk/latest/dg/tutorials.html

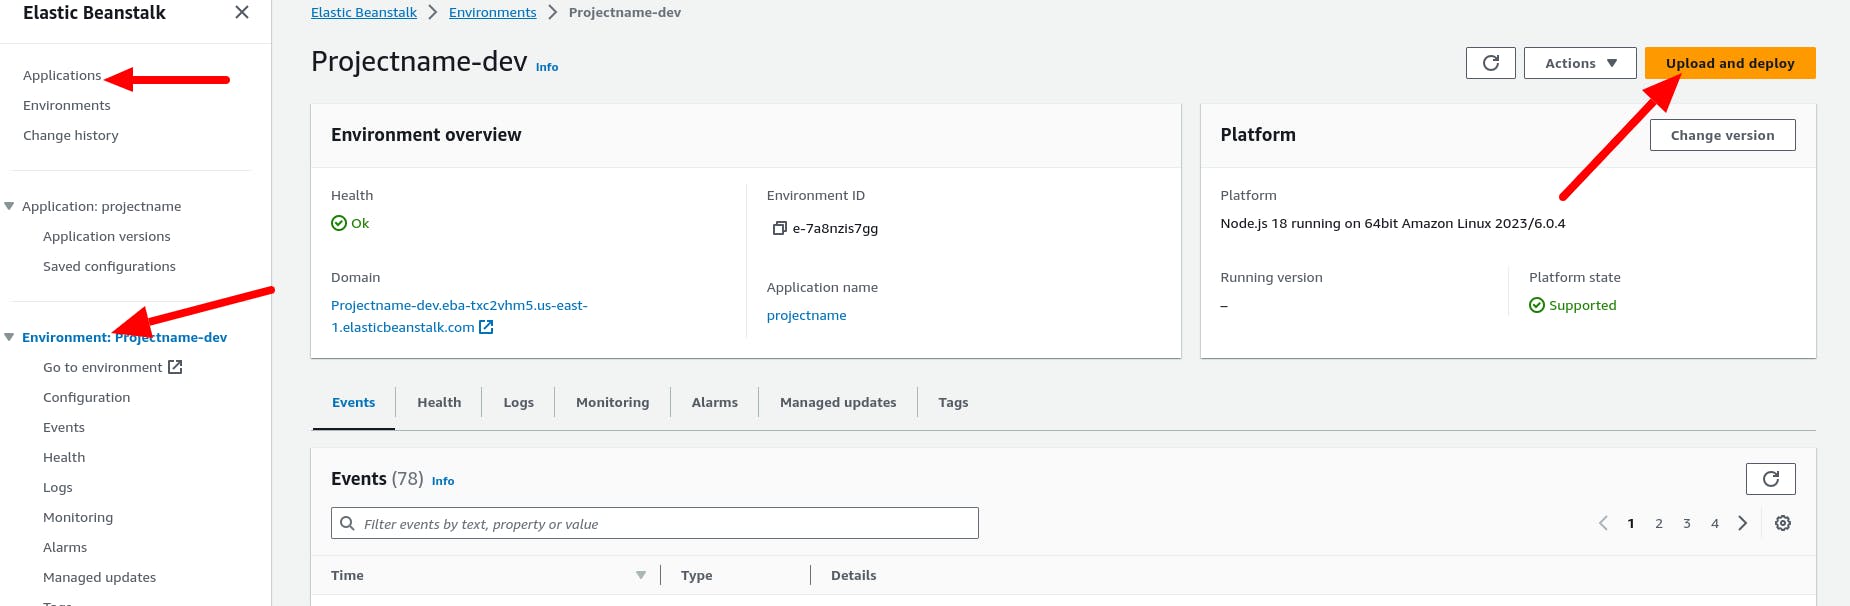
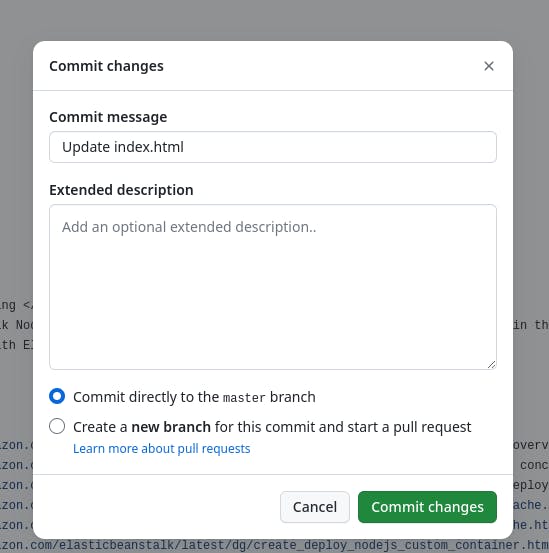
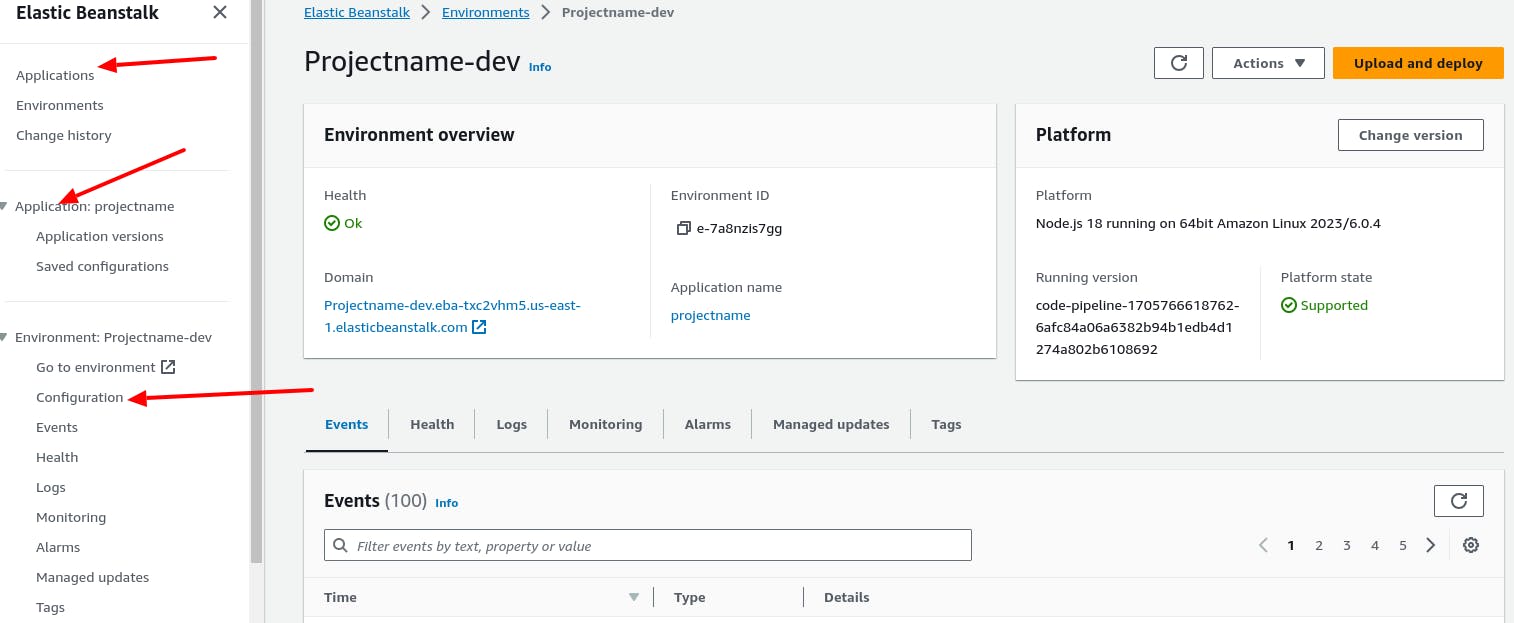
To update the code in Elastic Beanstalk ENV Navigate to to its Dashboard and the application and environment and click upload and deploy, Please make sure to upload a zip(when extracted get code not the folder inside).

How to update an Application with NPM Dependencies?
Important Point
You can specify these module dependencies using a package.json file in your Code. If Elastic Beanstalk detects this file and a node_modules directory isn't present, Elastic Beanstalk runs npm install as the webapp user. The npm install command installs the dependencies in the node_modules directory, which Elastic Beanstalk creates beforehand. The npm install command accesses the packages listed in the package.json file from the public npm registry or other locations. For more information,
If Elastic Beanstalk detects the node_modules directory, Elastic Beanstalk doesn't run npm install, even if a package.json file exists. Elastic Beanstalk assumes that the dependency packages are available in the node_modules directory for Node.js to access and load
Read More https://docs.aws.amazon.com/elasticbeanstalk/latest/dg/nodejs-platform-dependencies.html
Downtime in Deployment
Because the default Deployment Policy is All at once we have a Downtime

For Zero downtime Deployments, we can use another method
Rolling, Rolling with an additional batch, Immutable, Traffic splitting
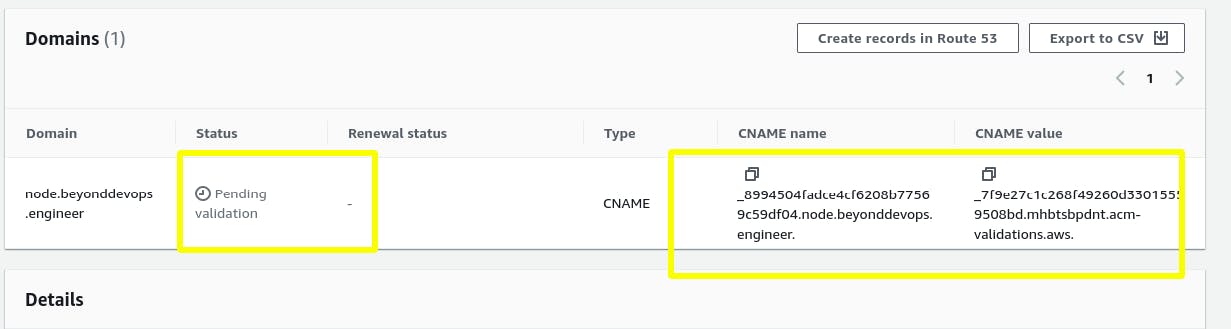
Add a Custom Domain record
Configuring a custom domain for your AWS Elastic Beanstalk environment allows you to access your application using a personalized domain name. Here's how to add a custom domain record
we need to add a Cname record to our Domain Registrar to Point our Custom Domain node.beyonddevops.engineer to AWS EB URL
Point the record to the Elastic Beanstalk environment URL provided by AWS. This URL usually follows the format [your-environment-name].[region].elasticbeanstalk.com

After adding the DNS record, verify that it has propagated correctly by using tools like DNScheker, It may take some time for the changes to propagate across the internet.

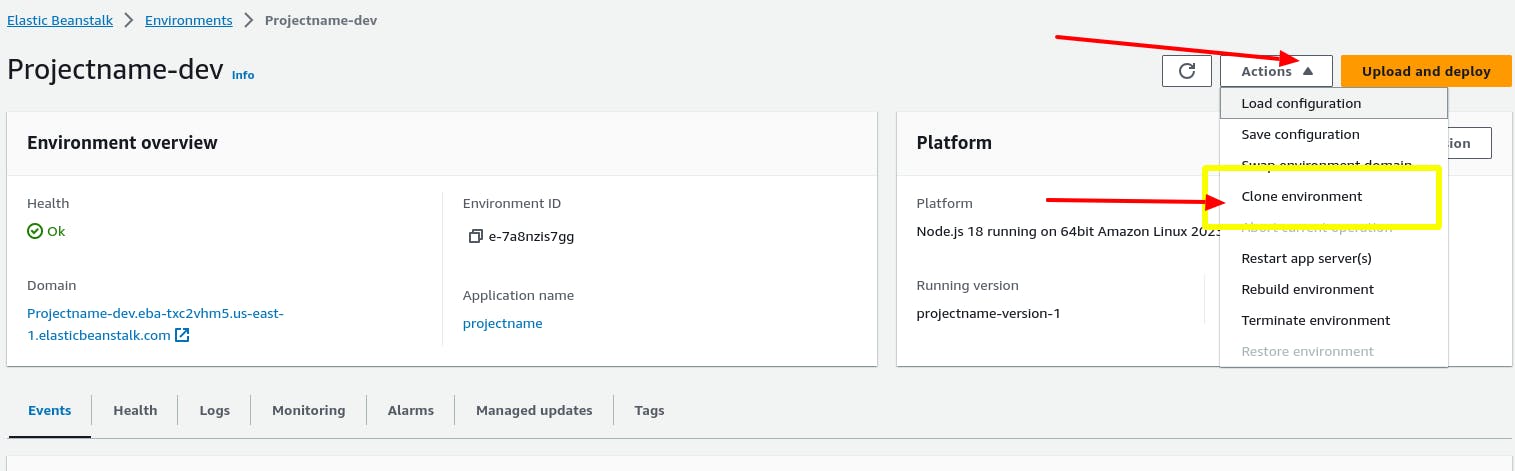
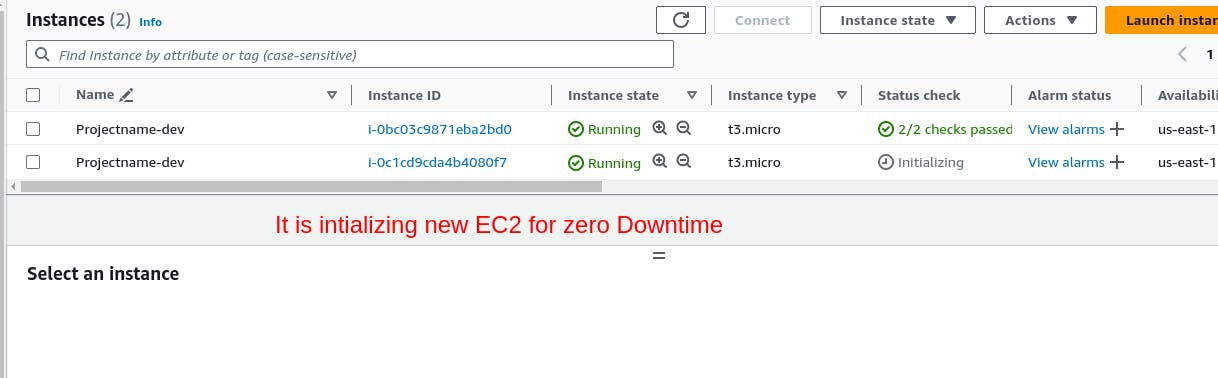
Perform a blue/green deployment
A blue/green deployment strategy in AWS Elastic Beanstalk allows you to deploy a new version of your application alongside the existing version,
Clone your current environment, or launch a new environment to run the platform version you want.
Deploy the new application version to the new environment.
Test the new version on the new environment.
On the environment overview page, choose Actions, and then choose Swap environment URLs.

For the Environment name, select the current environment. Choose Swap
Elastic Beanstalk swaps the CNAME records of the old and new environments, redirecting traffic from the old version to the new version.
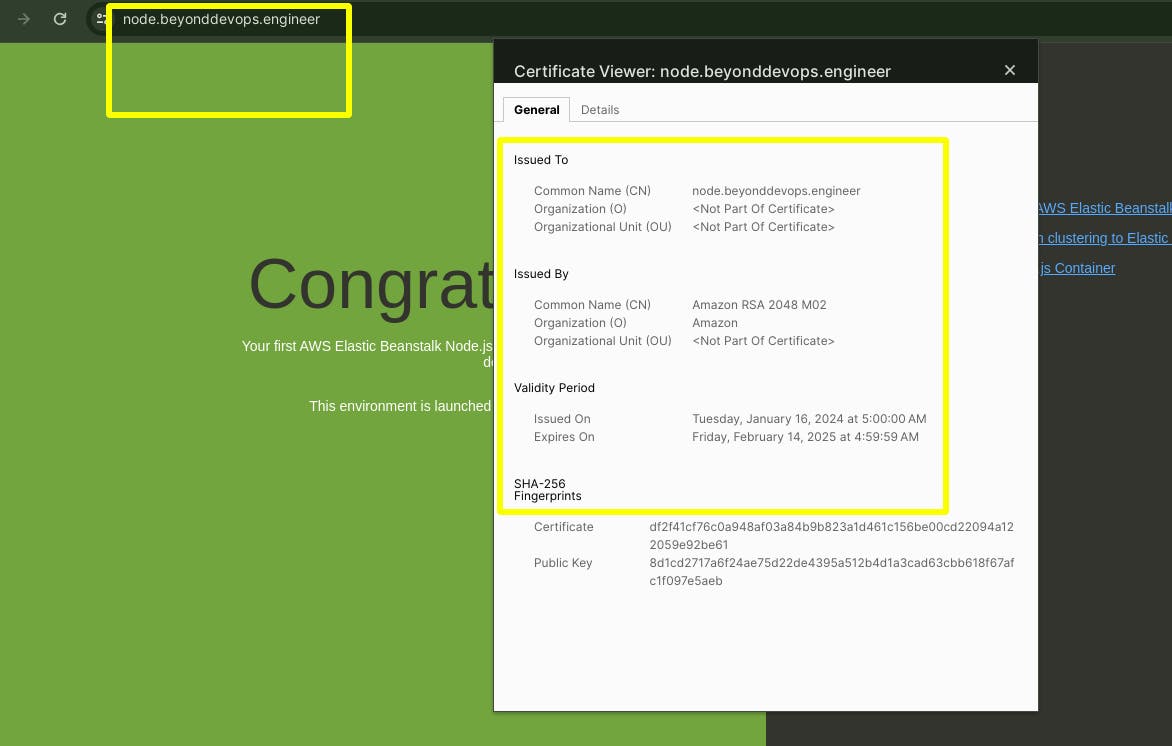
Add SSL in Elastic Beanstalk Environment Application
For this, we need the certificate either we can get from AWS ACM (if we have a domain ), or Import at AWS ACM from another third Party, I am choosing to Get from AWS ACM
console.aws.amazon.com/acm/home
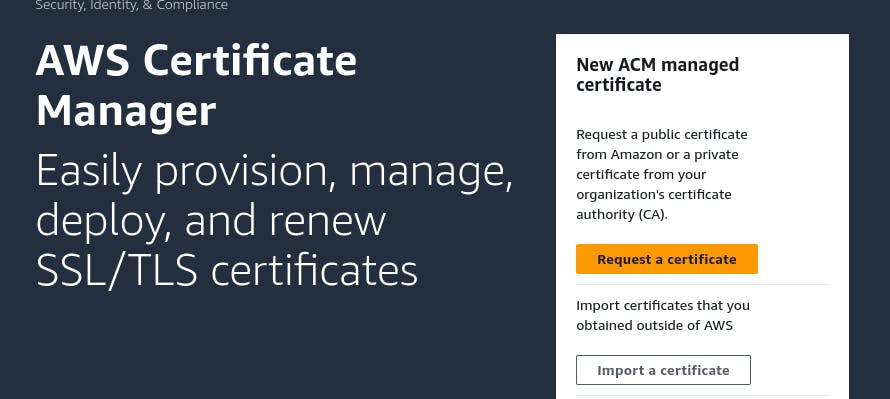


Verify Domain Ownership to get an Add SSL Certificate


Update Environment Configuration for SSL
Update the configuration to add a new Listner of SSL in Load balancer

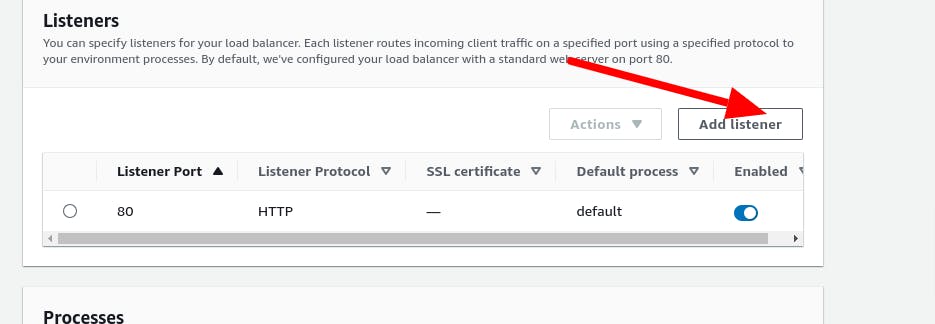
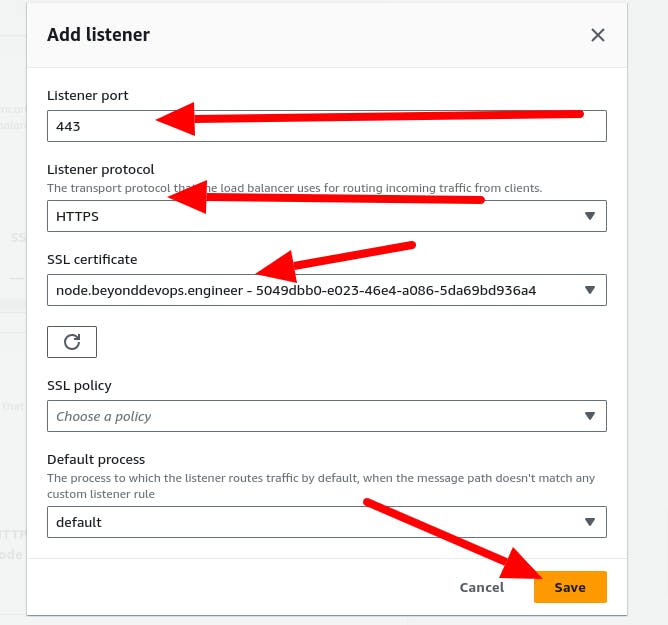
scroll down and apply

Accessing SSL with Custom Domain
Add Environment Variables in Elastic Beanstalk
f

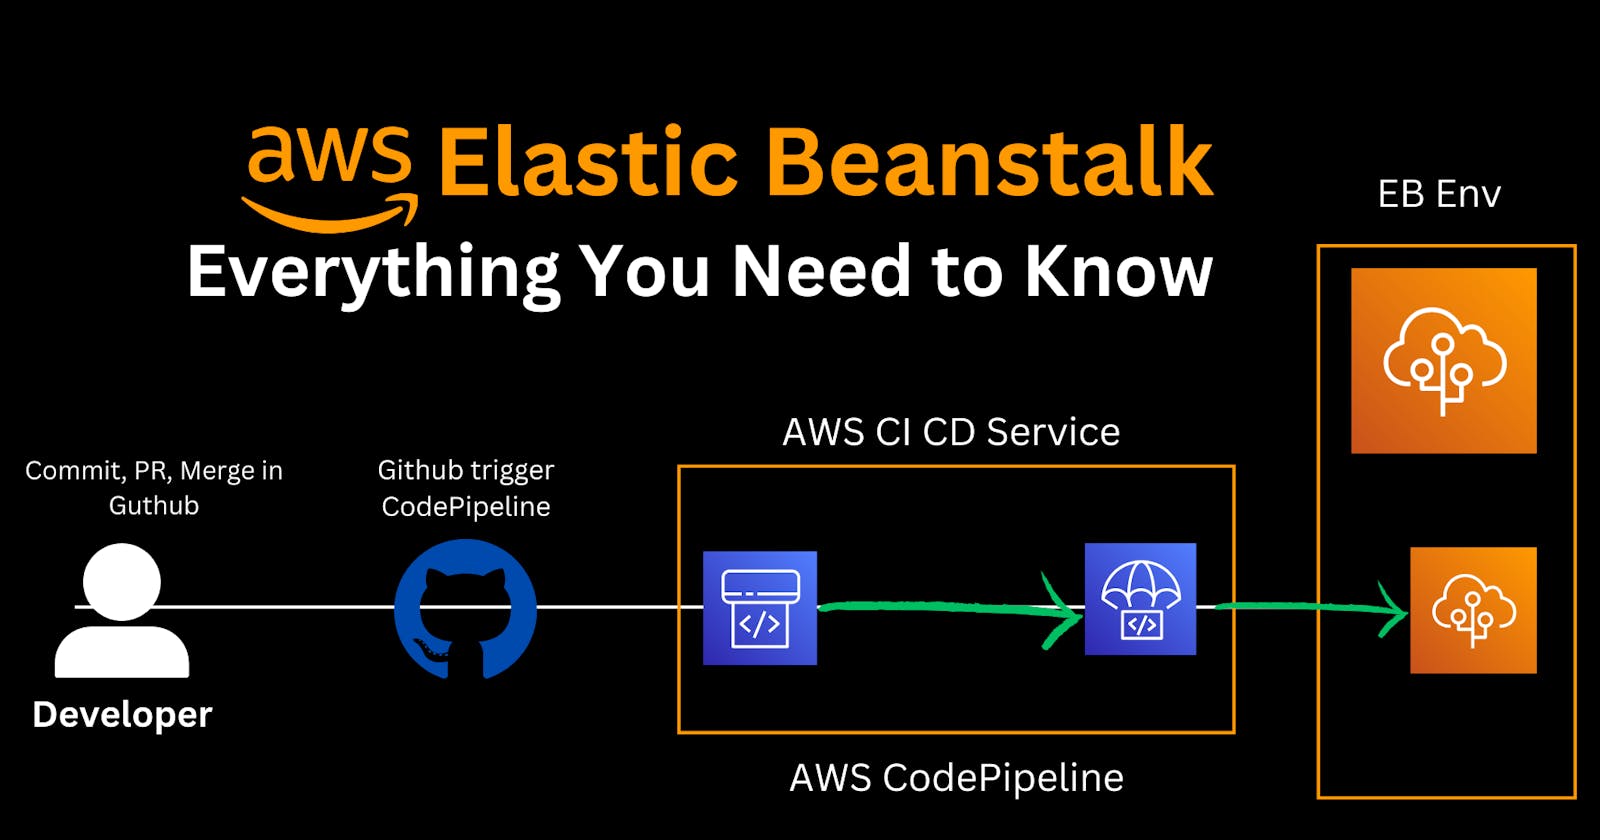
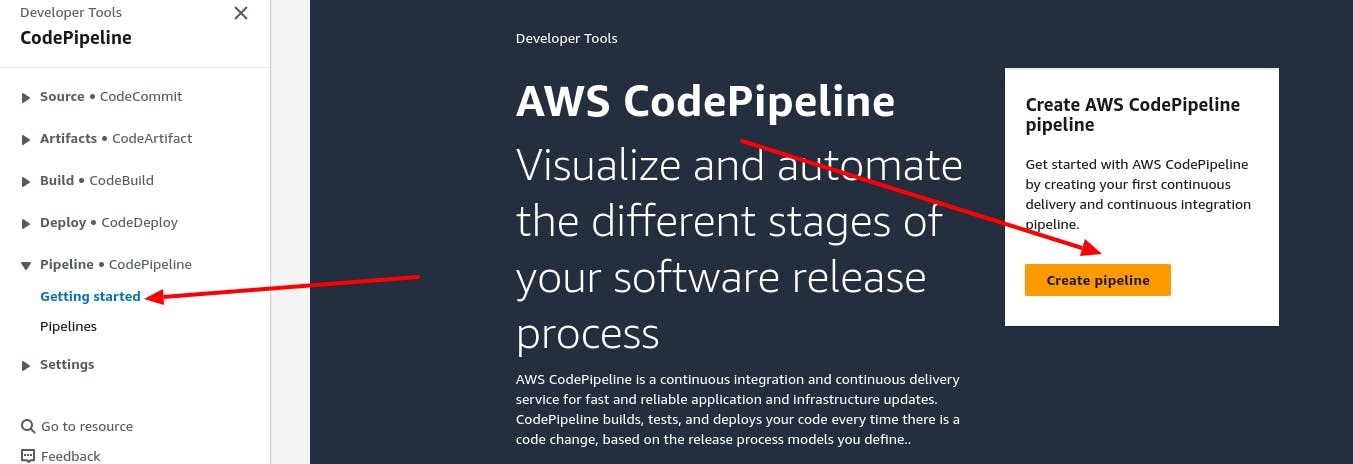
CI CD in ElasticBeanstalk?
We are choosing AWS CodePipeline, AWS CodeDeploy for CI-CD ,
Create a Connection with Github
we are creating a GitHub connection as our source code is at GitHub
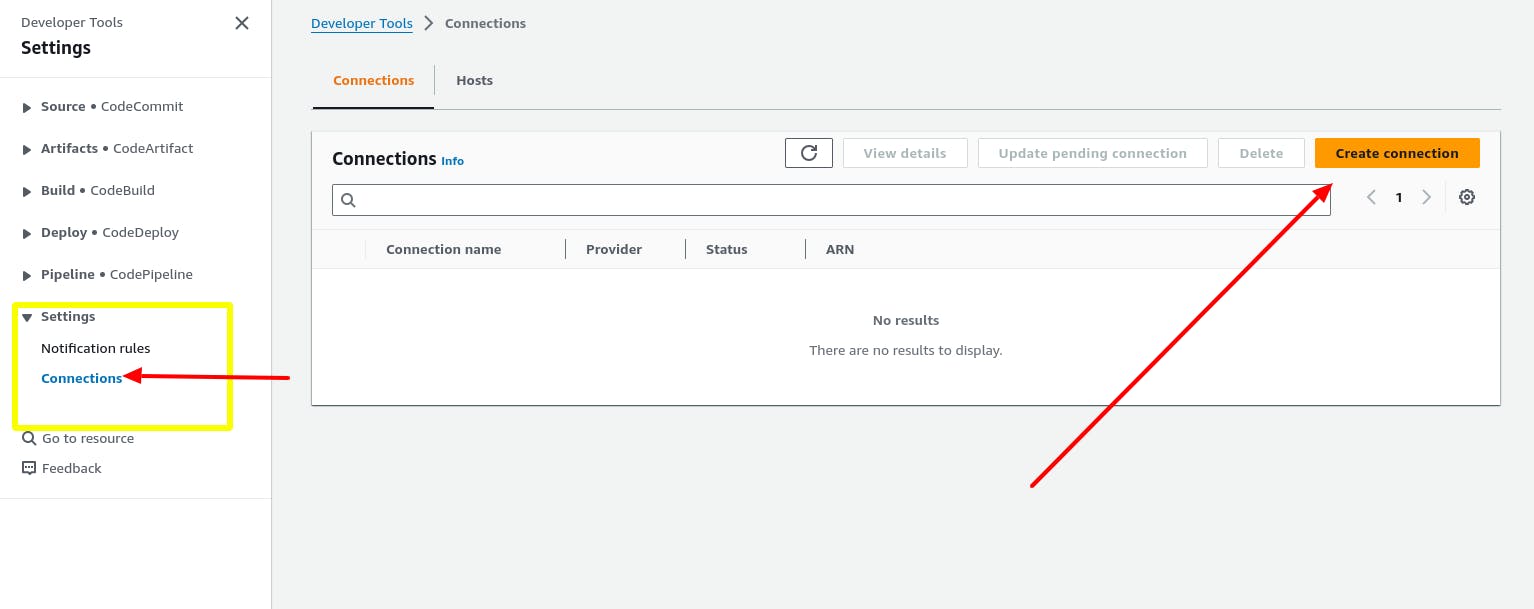

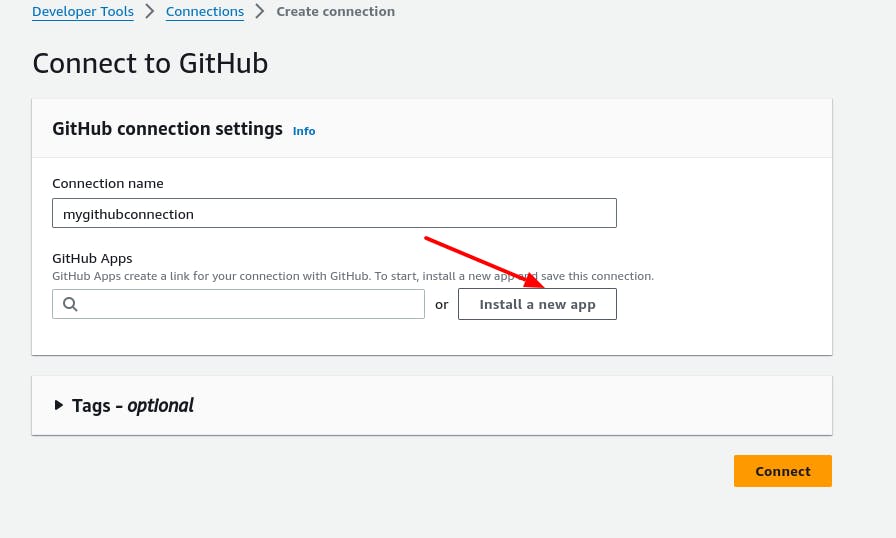
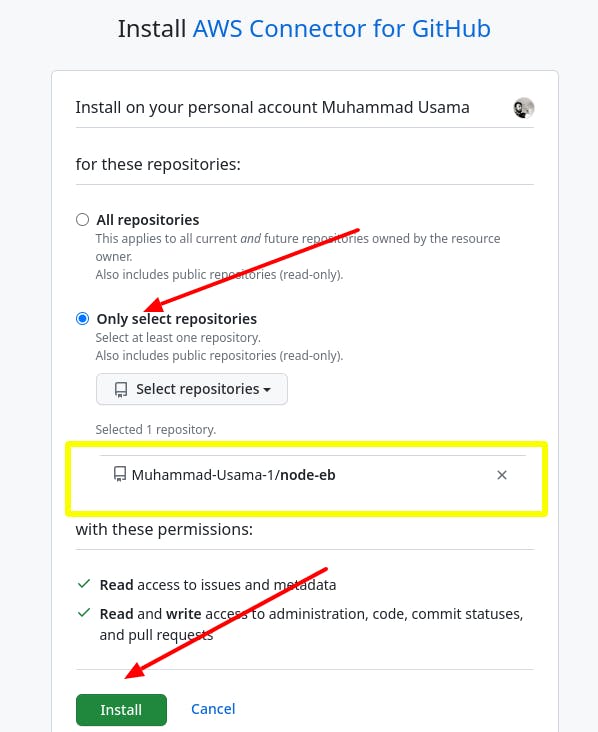
finally, click connect

WOW, we have connected AWS with our Github

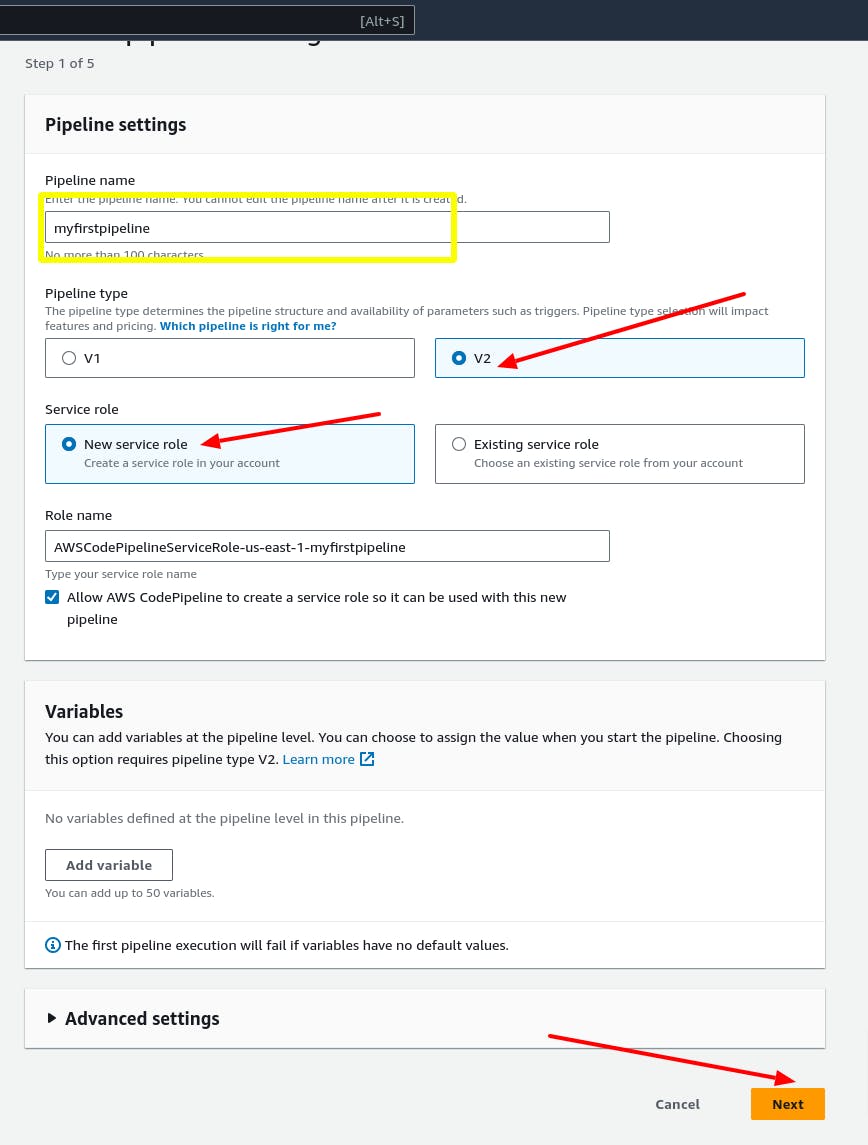
Creating Pipeline
Here we are creating a Pipeline with AWS Pipeline -> AWS CodeDeploy
Add source stage

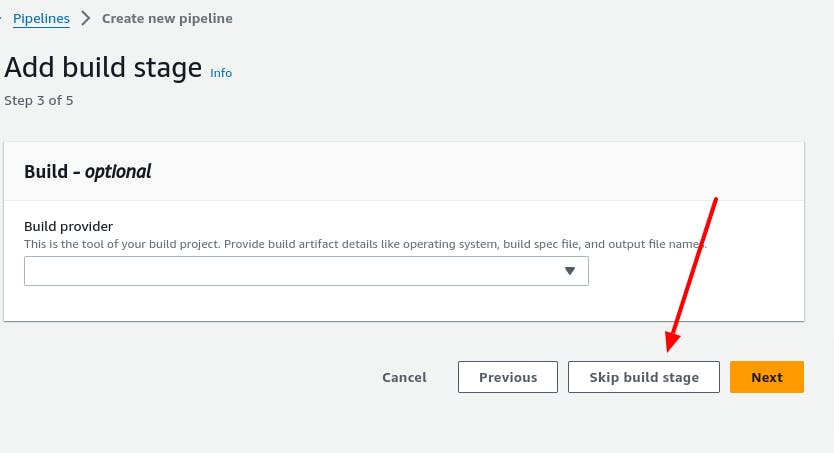
skip build stage
,We are skipping the Build stage as we don't have the requirements for this.
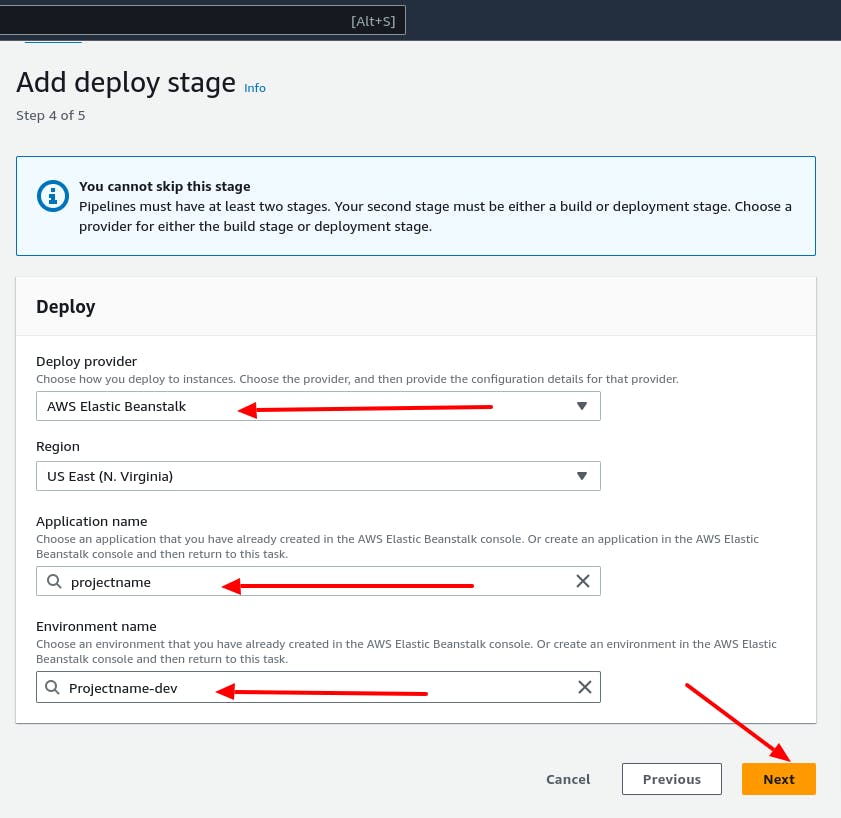
Add deploy stage
Review


Results of CI CD,
When we commit the change to gthub aws Pipeline triger the deployment , you can see th pipeline is succefull. , but this is causing a little downtime
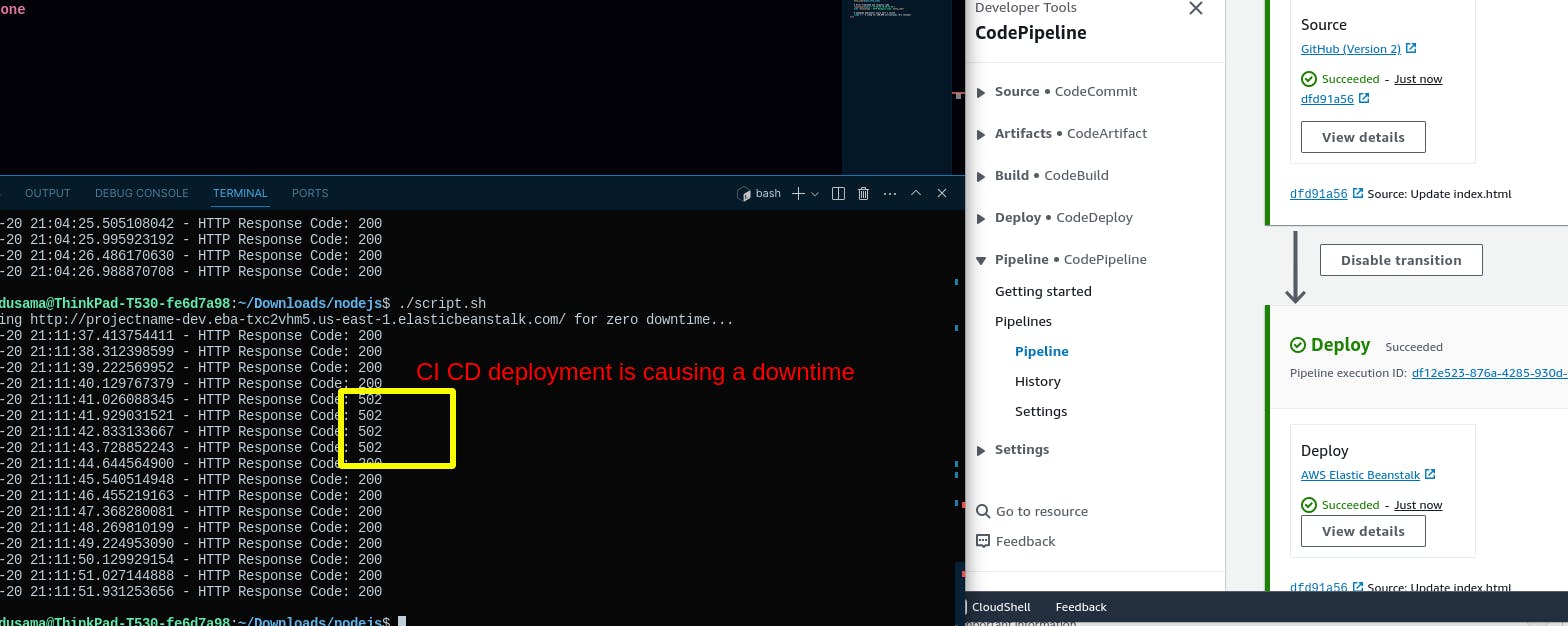
Monitoring http://projectname-dev.eba-txc2vhm5.us-east-1.elasticbeanstalk.com/ for zero downtime...
2024-01-20 21:11:37.413754411 - HTTP Response Code: 200
2024-01-20 21:11:38.312398599 - HTTP Response Code: 200
2024-01-20 21:11:39.222569952 - HTTP Response Code: 200
2024-01-20 21:11:40.129767379 - HTTP Response Code: 200
2024-01-20 21:11:41.026088345 - HTTP Response Code: 502
2024-01-20 21:11:41.929031521 - HTTP Response Code: 502
2024-01-20 21:11:42.833133667 - HTTP Response Code: 502
2024-01-20 21:11:43.728852243 - HTTP Response Code: 502
2024-01-20 21:11:44.644564900 - HTTP Response Code: 200
2024-01-20 21:11:45.540514948 - HTTP Response Code: 200
2024-01-20 21:11:46.455219163 - HTTP Response Code: 200
2024-01-20 21:11:47.368280081 - HTTP Response Code: 200
2024-01-20 21:11:48.269810199 - HTTP Response Code: 200
2024-01-20 21:11:49.224953090 - HTTP Response Code: 200
2024-01-20 21:11:50.129929154 - HTTP Response Code: 200
2024-01-20 21:11:51.027144888 - HTTP Response Code: 200
2024-01-20 21:11:51.931253656 - HTTP Response Code: 200
CI CD with zero Downtime
For Doing CI CD with zero downtime we just need to update the Deployment Policy in Elastic Beanstalk configuration

we need to change the Deployment Policy to Rolling or Rolling with an additional badge
The deployment batch size in a rolling update deployment strategy refers to the percentage of instances that will be updated during each interval of the deployment.
For example, if you specify a batch size of 30%, then during each interval:
CodeDeploy will update the application/configuration on 30% of the instances
It will then check if the new version is stable and healthy in those instances
Once verified, it will proceed to the next batch
This continues until all instances have been updated. Specifying a smaller batch size reduces risk if an issue is encountered, but increases total deployment time. A larger batch size means faster deployments, but with more instances potentially affected if a problem occurs.
The optimal batch size value depends on your application and infrastructure. AWS documentation provides guidance on choosing the right size for your environment.

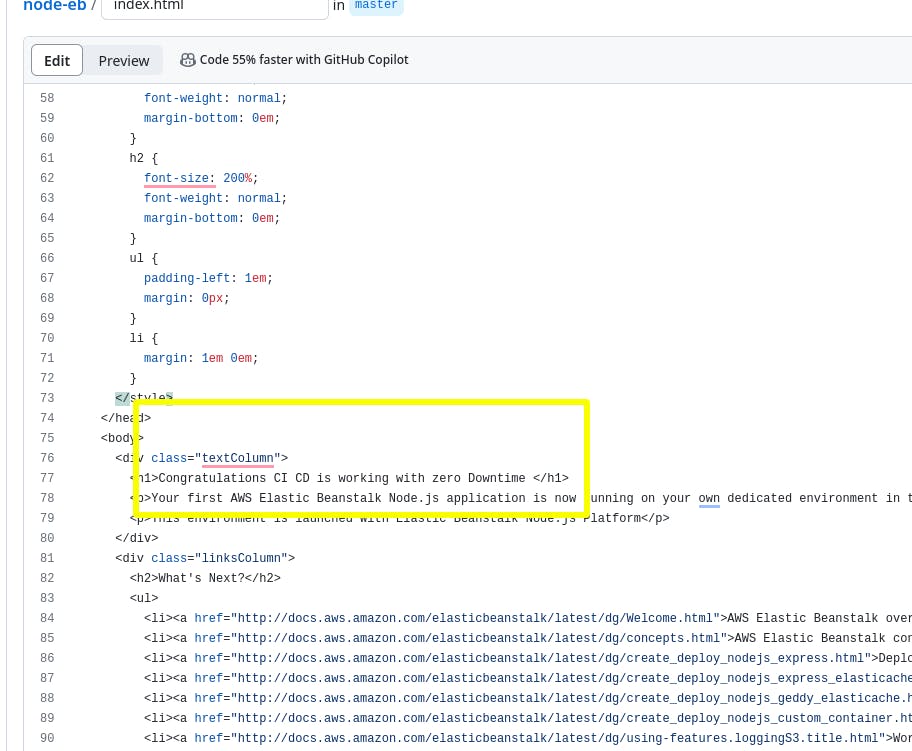
Update the code toTest the Zero Downtime
EC2 Dashboard


Monitored Result of Downtime
muhammadusama@ThinkPad-T530-fe6d7a98:~/Downloads/nodejs$ ./script.sh
Monitoring http://projectname-dev.eba-txc2vhm5.us-east-1.elasticbeanstalk.com/ for zero downtime...
2024-01-20 23:18:16.820018750 - HTTP Response Code: 200
2024-01-20 23:18:17.735286719 - HTTP Response Code: 200
2024-01-20 23:18:18.654669218 - HTTP Response Code: 200
2024-01-20 23:18:19.567798817 - HTTP Response Code: 200
2024-01-20 23:18:20.466845020 - HTTP Response Code: 200
2024-01-20 23:18:21.363614276 - HTTP Response Code: 200
2024-01-20 23:18:22.269424912 - HTTP Response Code: 200
2024-01-20 23:18:23.167063220 - HTTP Response Code: 200
2024-01-20 23:18:24.064049560 - HTTP Response Code: 200
2024-01-20 23:18:24.990761579 - HTTP Response Code: 200
2024-01-20 23:18:25.923672410 - HTTP Response Code: 200
2024-01-20 23:18:26.831302998 - HTTP Response Code: 200
2024-01-20 23:18:27.726153084 - HTTP Response Code: 200
2024-01-20 23:18:28.622188669 - HTTP Response Code: 200
2024-01-20 23:18:29.512732320 - HTTP Response Code: 200
2024-01-20 23:18:30.411575109 - HTTP Response Code: 200
2024-01-20 23:18:31.309396002 - HTTP Response Code: 200
2024-01-20 23:18:32.202993723 - HTTP Response Code: 200
2024-01-20 23:18:33.096130617 - HTTP Response Code: 200
2024-01-20 23:18:33.993014454 - HTTP Response Code: 200
2024-01-20 23:18:34.886684101 - HTTP Response Code: 200
2024-01-20 23:18:35.784751380 - HTTP Response Code: 200
2024-01-20 23:18:36.781003843 - HTTP Response Code: 200
2024-01-20 23:18:37.689522473 - HTTP Response Code: 200
2024-01-20 23:18:38.588376177 - HTTP Response Code: 200
2024-01-20 23:18:39.484194599 - HTTP Response Code: 200
2024-01-20 23:18:40.381785548 - HTTP Response Code: 200
2024-01-20 23:18:41.280132261 - HTTP Response Code: 200
2024-01-20 23:18:42.171148006 - HTTP Response Code: 200
2024-01-20 23:18:43.059826914 - HTTP Response Code: 200
2024-01-20 23:18:43.951432414 - HTTP Response Code: 200
2024-01-20 23:18:44.850562290 - HTTP Response Code: 200
2024-01-20 23:18:45.747066196 - HTTP Response Code: 200
2024-01-20 23:18:46.640900372 - HTTP Response Code: 200
2024-01-20 23:18:47.529711491 - HTTP Response Code: 200
2024-01-20 23:18:48.422619985 - HTTP Response Code: 200
2024-01-20 23:18:49.311891891 - HTTP Response Code: 200
2024-01-20 23:18:50.203074924 - HTTP Response Code: 200
2024-01-20 23:18:51.095963564 - HTTP Response Code: 200
2024-01-20 23:18:51.992169571 - HTTP Response Code: 200
2024-01-20 23:18:52.882315216 - HTTP Response Code: 200
2024-01-20 23:18:53.781991687 - HTTP Response Code: 200
2024-01-20 23:18:54.671272083 - HTTP Response Code: 200
2024-01-20 23:18:55.571486350 - HTTP Response Code: 200
2024-01-20 23:18:56.462508825 - HTTP Response Code: 200
2024-01-20 23:18:57.351722429 - HTTP Response Code: 200
2024-01-20 23:18:58.248521965 - HTTP Response Code: 200
2024-01-20 23:18:59.139283297 - HTTP Response Code: 200
2024-01-20 23:19:00.039708994 - HTTP Response Code: 200
2024-01-20 23:19:00.933259936 - HTTP Response Code: 200
2024-01-20 23:19:01.837064034 - HTTP Response Code: 200
2024-01-20 23:19:02.727039188 - HTTP Response Code: 200
2024-01-20 23:19:03.613734120 - HTTP Response Code: 200
2024-01-20 23:19:04.518483874 - HTTP Response Code: 200
2024-01-20 23:19:05.412218927 - HTTP Response Code: 200
2024-01-20 23:19:06.304039769 - HTTP Response Code: 200
2024-01-20 23:19:07.194791563 - HTTP Response Code: 200
2024-01-20 23:19:08.085983583 - HTTP Response Code: 200
2024-01-20 23:19:08.979507156 - HTTP Response Code: 200
2024-01-20 23:19:09.868645730 - HTTP Response Code: 200
2024-01-20 23:19:10.761577591 - HTTP Response Code: 200
2024-01-20 23:19:11.661988684 - HTTP Response Code: 200
2024-01-20 23:19:12.556195489 - HTTP Response Code: 200
2024-01-20 23:19:13.446297134 - HTTP Response Code: 200
2024-01-20 23:19:14.350385608 - HTTP Response Code: 200
2024-01-20 23:19:15.243579282 - HTTP Response Code: 200
2024-01-20 23:19:16.137224237 - HTTP Response Code: 200
2024-01-20 23:19:17.121326452 - HTTP Response Code: 200
2024-01-20 23:19:18.016662407 - HTTP Response Code: 200
2024-01-20 23:19:18.911975298 - HTTP Response Code: 200
2024-01-20 23:19:19.807216301 - HTTP Response Code: 200
2024-01-20 23:19:20.720560264 - HTTP Response Code: 200
2024-01-20 23:19:21.612958601 - HTTP Response Code: 200
2024-01-20 23:19:22.505731734 - HTTP Response Code: 200
2024-01-20 23:19:23.397702773 - HTTP Response Code: 200
2024-01-20 23:19:24.294621022 - HTTP Response Code: 200
2024-01-20 23:19:25.189336745 - HTTP Response Code: 200
2024-01-20 23:19:26.089333481 - HTTP Response Code: 200
2024-01-20 23:19:26.983705949 - HTTP Response Code: 200
2024-01-20 23:19:27.875962705 - HTTP Response Code: 200
2024-01-20 23:19:28.776405817 - HTTP Response Code: 200
2024-01-20 23:19:29.669802671 - HTTP Response Code: 200
2024-01-20 23:19:30.563834210 - HTTP Response Code: 200
2024-01-20 23:19:31.456611710 - HTTP Response Code: 200
2024-01-20 23:19:32.349049043 - HTTP Response Code: 200
2024-01-20 23:19:33.245571408 - HTTP Response Code: 200
2024-01-20 23:19:34.143602889 - HTTP Response Code: 200
2024-01-20 23:19:35.045014684 - HTTP Response Code: 200
2024-01-20 23:19:35.942462066 - HTTP Response Code: 200
2024-01-20 23:19:36.836057234 - HTTP Response Code: 200
2024-01-20 23:19:37.733699148 - HTTP Response Code: 200
2024-01-20 23:19:38.640000039 - HTTP Response Code: 200
2024-01-20 23:19:39.529881600 - HTTP Response Code: 200
2024-01-20 23:19:40.426079483 - HTTP Response Code: 200
2024-01-20 23:19:41.322283026 - HTTP Response Code: 200
2024-01-20 23:19:42.224713627 - HTTP Response Code: 200
2024-01-20 23:19:43.117800358 - HTTP Response Code: 200
2024-01-20 23:19:44.007979199 - HTTP Response Code: 200
2024-01-20 23:19:44.913827533 - HTTP Response Code: 200
2024-01-20 23:19:45.807767782 - HTTP Response Code: 200
2024-01-20 23:19:46.706013418 - HTTP Response Code: 200
2024-01-20 23:19:47.600333464 - HTTP Response Code: 200
2024-01-20 23:19:48.522181035 - HTTP Response Code: 200
2024-01-20 23:19:49.419157131 - HTTP Response Code: 200
2024-01-20 23:19:50.313330116 - HTTP Response Code: 200
2024-01-20 23:19:51.214701248 - HTTP Response Code: 200
2024-01-20 23:19:52.123382627 - HTTP Response Code: 200
2024-01-20 23:19:53.022505766 - HTTP Response Code: 200
2024-01-20 23:19:53.914750955 - HTTP Response Code: 200
2024-01-20 23:19:54.808527200 - HTTP Response Code: 200
2024-01-20 23:19:55.701451340 - HTTP Response Code: 200
2024-01-20 23:19:56.596207261 - HTTP Response Code: 200
2024-01-20 23:19:57.492754702 - HTTP Response Code: 200
2024-01-20 23:19:58.395661791 - HTTP Response Code: 200
2024-01-20 23:19:59.293352837 - HTTP Response Code: 200
2024-01-20 23:20:00.196789966 - HTTP Response Code: 200
2024-01-20 23:20:01.090917100 - HTTP Response Code: 200
2024-01-20 23:20:01.980884683 - HTTP Response Code: 200
2024-01-20 23:20:02.873017133 - HTTP Response Code: 200
2024-01-20 23:20:03.772370808 - HTTP Response Code: 200
2024-01-20 23:20:04.763757847 - HTTP Response Code: 200
2024-01-20 23:20:05.657188233 - HTTP Response Code: 200
2024-01-20 23:20:06.554161342 - HTTP Response Code: 200
2024-01-20 23:20:07.452146151 - HTTP Response Code: 200
2024-01-20 23:20:08.346425252 - HTTP Response Code: 200
2024-01-20 23:20:09.252142216 - HTTP Response Code: 200
2024-01-20 23:20:10.151274325 - HTTP Response Code: 200
2024-01-20 23:20:11.052635510 - HTTP Response Code: 200
2024-01-20 23:20:11.950089358 - HTTP Response Code: 200
2024-01-20 23:20:12.854364000 - HTTP Response Code: 200
2024-01-20 23:20:13.754746232 - HTTP Response Code: 200
2024-01-20 23:20:14.655924299 - HTTP Response Code: 200
2024-01-20 23:20:15.545225559 - HTTP Response Code: 200
2024-01-20 23:20:16.437214667 - HTTP Response Code: 200
2024-01-20 23:20:17.424936412 - HTTP Response Code: 200
2024-01-20 23:20:18.314002859 - HTTP Response Code: 200
2024-01-20 23:20:19.206822288 - HTTP Response Code: 200
2024-01-20 23:20:20.099155972 - HTTP Response Code: 200
2024-01-20 23:20:20.993520525 - HTTP Response Code: 200
2024-01-20 23:20:21.884363323 - HTTP Response Code: 200
2024-01-20 23:20:22.779559973 - HTTP Response Code: 200
2024-01-20 23:20:23.675827860 - HTTP Response Code: 200
2024-01-20 23:20:24.572947312 - HTTP Response Code: 200
2024-01-20 23:20:25.469515931 - HTTP Response Code: 200
2024-01-20 23:20:26.359094414 - HTTP Response Code: 200
2024-01-20 23:20:27.254901995 - HTTP Response Code: 200
2024-01-20 23:20:28.146455693 - HTTP Response Code: 200
2024-01-20 23:20:29.039473966 - HTTP Response Code: 200
2024-01-20 23:20:29.930585894 - HTTP Response Code: 200
2024-01-20 23:20:30.826053347 - HTTP Response Code: 200
2024-01-20 23:20:31.714027647 - HTTP Response Code: 200
2024-01-20 23:20:32.607388443 - HTTP Response Code: 200
2024-01-20 23:20:33.503675301 - HTTP Response Code: 200
2024-01-20 23:20:34.394648474 - HTTP Response Code: 200
2024-01-20 23:20:35.285995014 - HTTP Response Code: 200
2024-01-20 23:20:36.182864597 - HTTP Response Code: 200
2024-01-20 23:20:37.077379361 - HTTP Response Code: 200
2024-01-20 23:20:37.977367877 - HTTP Response Code: 200
2024-01-20 23:20:38.882044441 - HTTP Response Code: 200
2024-01-20 23:20:39.776736536 - HTTP Response Code: 200
2024-01-20 23:20:40.667274568 - HTTP Response Code: 200
2024-01-20 23:20:41.560704673 - HTTP Response Code: 200
2024-01-20 23:20:42.452363523 - HTTP Response Code: 200
2024-01-20 23:20:43.345017385 - HTTP Response Code: 200
2024-01-20 23:20:44.237976807 - HTTP Response Code: 200
2024-01-20 23:20:45.129577973 - HTTP Response Code: 200
2024-01-20 23:20:46.022358331 - HTTP Response Code: 200
2024-01-20 23:20:46.912946841 - HTTP Response Code: 200
2024-01-20 23:20:47.806044505 - HTTP Response Code: 200
2024-01-20 23:20:48.698358005 - HTTP Response Code: 200
2024-01-20 23:20:49.595568614 - HTTP Response Code: 200
2024-01-20 23:20:50.487904317 - HTTP Response Code: 200
2024-01-20 23:20:51.380705948 - HTTP Response Code: 200
2024-01-20 23:20:52.277378540 - HTTP Response Code: 200
2024-01-20 23:20:53.171103049 - HTTP Response Code: 200
2024-01-20 23:20:54.066507620 - HTTP Response Code: 200
2024-01-20 23:20:54.959455229 - HTTP Response Code: 200
2024-01-20 23:20:55.848763930 - HTTP Response Code: 200
2024-01-20 23:20:56.747793394 - HTTP Response Code: 200
2024-01-20 23:20:57.673086669 - HTTP Response Code: 200
2024-01-20 23:20:58.577574580 - HTTP Response Code: 200
2024-01-20 23:20:59.487393139 - HTTP Response Code: 200
2024-01-20 23:21:00.389336103 - HTTP Response Code: 200
2024-01-20 23:21:01.293165991 - HTTP Response Code: 200
2024-01-20 23:21:02.197826911 - HTTP Response Code: 200
2024-01-20 23:21:03.132293231 - HTTP Response Code: 200
2024-01-20 23:21:04.136360613 - HTTP Response Code: 200
2024-01-20 23:21:05.110483621 - HTTP Response Code: 200
2024-01-20 23:21:06.409632243 - HTTP Response Code: 200
2024-01-20 23:21:07.557009661 - HTTP Response Code: 200
2024-01-20 23:21:09.519100939 - HTTP Response Code: 200
2024-01-20 23:21:11.366206805 - HTTP Response Code: 200
2024-01-20 23:21:13.079946480 - HTTP Response Code: 200
2024-01-20 23:21:14.572673437 - HTTP Response Code: 200
2024-01-20 23:21:17.319411059 - HTTP Response Code: 200
2024-01-20 23:21:19.013745674 - HTTP Response Code: 200
2024-01-20 23:21:20.366250737 - HTTP Response Code: 200
2024-01-20 23:21:21.803982543 - HTTP Response Code: 200
2024-01-20 23:21:22.998335220 - HTTP Response Code: 200
2024-01-20 23:21:23.947321974 - HTTP Response Code: 200
2024-01-20 23:21:24.881474910 - HTTP Response Code: 200
2024-01-20 23:21:25.784127982 - HTTP Response Code: 200
2024-01-20 23:21:26.683868879 - HTTP Response Code: 200
2024-01-20 23:21:27.575074043 - HTTP Response Code: 200
2024-01-20 23:21:28.467551598 - HTTP Response Code: 200
2024-01-20 23:21:29.366013174 - HTTP Response Code: 200
2024-01-20 23:21:30.267117513 - HTTP Response Code: 200
2024-01-20 23:21:31.156786365 - HTTP Response Code: 200
2024-01-20 23:21:32.051656734 - HTTP Response Code: 200
2024-01-20 23:21:32.946421989 - HTTP Response Code: 200
2024-01-20 23:21:33.839646482 - HTTP Response Code: 200
2024-01-20 23:21:34.733080569 - HTTP Response Code: 200
2024-01-20 23:21:35.625510349 - HTTP Response Code: 200
2024-01-20 23:21:36.529826751 - HTTP Response Code: 200
2024-01-20 23:21:37.425554744 - HTTP Response Code: 200
2024-01-20 23:21:38.321011385 - HTTP Response Code: 200
2024-01-20 23:21:39.213766086 - HTTP Response Code: 200
2024-01-20 23:21:40.103871594 - HTTP Response Code: 200
2024-01-20 23:21:40.998338759 - HTTP Response Code: 200
2024-01-20 23:21:41.894337057 - HTTP Response Code: 200
2024-01-20 23:21:42.786583302 - HTTP Response Code: 200
2024-01-20 23:21:43.676992413 - HTTP Response Code: 200
2024-01-20 23:21:44.574634010 - HTTP Response Code: 200
2024-01-20 23:21:45.465821758 - HTTP Response Code: 200
2024-01-20 23:21:46.355896003 - HTTP Response Code: 200
2024-01-20 23:21:47.252193765 - HTTP Response Code: 200
2024-01-20 23:21:48.143809508 - HTTP Response Code: 200
2024-01-20 23:21:49.035120316 - HTTP Response Code: 200
2024-01-20 23:21:49.932203847 - HTTP Response Code: 200
2024-01-20 23:21:50.828742835 - HTTP Response Code: 200
2024-01-20 23:21:51.722634871 - HTTP Response Code: 200
2024-01-20 23:21:52.623116195 - HTTP Response Code: 200
2024-01-20 23:21:53.573349170 - HTTP Response Code: 200
2024-01-20 23:21:54.470904331 - HTTP Response Code: 200
2024-01-20 23:21:55.368264617 - HTTP Response Code: 200
2024-01-20 23:21:56.277533387 - HTTP Response Code: 200
2024-01-20 23:21:57.175898201 - HTTP Response Code: 200
2024-01-20 23:21:58.129450794 - HTTP Response Code: 200
2024-01-20 23:21:59.025477438 - HTTP Response Code: 200
2024-01-20 23:21:59.915571447 - HTTP Response Code: 200
2024-01-20 23:22:00.813444268 - HTTP Response Code: 200
2024-01-20 23:22:01.707591876 - HTTP Response Code: 200
2024-01-20 23:22:02.626531560 - HTTP Response Code: 200
2024-01-20 23:22:03.520921568 - HTTP Response Code: 200
2024-01-20 23:22:04.414095903 - HTTP Response Code: 200
2024-01-20 23:22:05.308826629 - HTTP Response Code: 200
2024-01-20 23:22:06.203922528 - HTTP Response Code: 200
2024-01-20 23:22:07.102150057 - HTTP Response Code: 200
2024-01-20 23:22:08.006461176 - HTTP Response Code: 200
2024-01-20 23:22:08.910730095 - HTTP Response Code: 200
2024-01-20 23:22:09.803502241 - HTTP Response Code: 200
2024-01-20 23:22:10.695316836 - HTTP Response Code: 200
2024-01-20 23:22:11.589510046 - HTTP Response Code: 200
2024-01-20 23:22:12.482050375 - HTTP Response Code: 200
2024-01-20 23:22:13.383815456 - HTTP Response Code: 200
2024-01-20 23:22:14.283845516 - HTTP Response Code: 200
Perform a blue/green deployment
How you Perform Blue Green Deployment depends upon you but the important feature AWS provides us is the Swap Environment Domain
Clone your current environment, or launch a new environment to run the platform version you want.

After cloning or Creating an ENV Deploy the new application version to the new environment.
Test the new version on the new environment URL.
If your new Application is working as expected you can choose to SWAP your ENV.
On the environment overview page, choose Actions, and then choose Swap environment URLs.

Clone the ENVIRONMENT

How to Save Configuration?

How to Terminate , Restore?


Configuration options
AWS Elastic Beanstalk supports a large number of configuration options that let you modify the settings that are applied to resources in your environment.
You can add AWS Elastic Beanstalk configuration files (.ebextensions) to your web application's source code to configure your environment and customize the AWS resources that it contains. Configuration files are YAML- or JSON-formatted documents with a .config file extension that you place in a folder named .ebextensions and deploy in your application source bundle.
.ebextensions vs .platform files in Elastic Beanstalk
.ebextensions allow you to customize the EC2 instances in your Elastic Beanstalk environment. You can use it to install additional packages, create/modify files, and run custom commands during different lifecycle events of the EC2 instances like at launch, deployment, etc. For example
packages: yum: git: []

files: "/etc/nginx/nginx.conf": content: | worker_processes 1;
.platform files allow you to customize the platform configuration using platform hooks. Platform hooks run custom scripts during application configuration deployment.
There are two types of platform hooks
Application deployment hooks - Run during application deployment or when configuration changes require terminating and recreating instances
Configuration deployment hooks - Run during configuration deployment when changes only update instances without recreating them
In summary, .ebextensions customize the EC2 instances in your environment whereas .platform allows customizing the platform configuration itself using hooks.
Note: Platform hooks are not supported on Amazon Linux platform versions before Amazon Linux 2.
Monitoring an environment
we can Monitor an env
In the navigation pane, choose Environments, and then choose the name of your environment from the list.
In the navigation pane, choose Monitoring.
Elastic Beanstalk provides features that monitor statistics about your application and create alerts that trigger when thresholds are exceeded.
Environment health reporting
AWS Elastic Beanstalk uses information from multiple sources to determine if your environment is available and processing requests from the Internet.
An environment's health is represented by one of four colors

The basic health reporting system provides information about the health of instances in an Elastic Beanstalk environment based on health checks performed by Elastic Load Balancing for load-balanced environments, or Amazon Elastic Compute Cloud for single-instance environments.
In addition to checking the health of your EC2 instances, Elastic Beanstalk also monitors the other resources in your environment and reports missing or incorrectly configured resources that can cause your environment to become unavailable to users.
Read More: https://docs.aws.amazon.com/elasticbeanstalk/latest/dg/using-features.healthstatus.html